
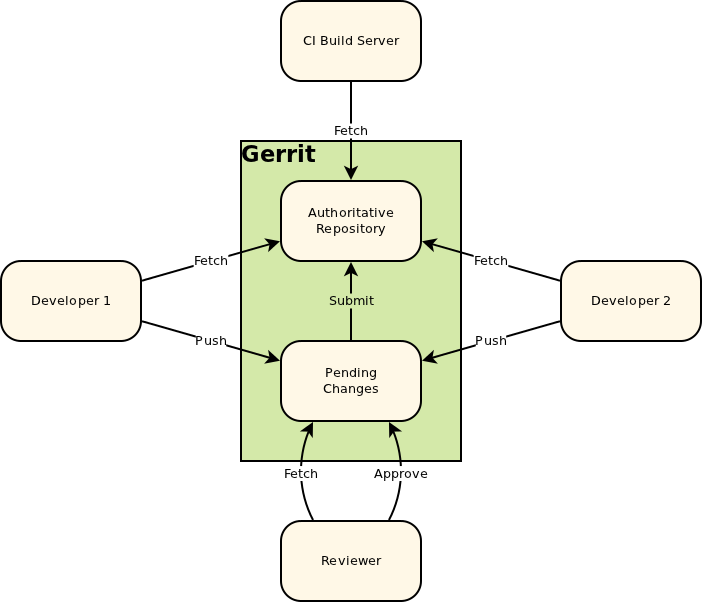
Contributing to OpenStack can be tricky at times because of the gerrit, a web collaboration tool and jenkins, a continuous integration system. Gerrit is a web based code collaboration system and Jenkins is continuous integration (CI) system which maintains a sane and deployable version of the code at all the time.
Although, both makes like easier for experienced developers and system integrators, it can be intimidating for a newbie, myself being one. So, here I present some basic steps one has to take for submitting code for review in jenkins.
- Create an account at https://review.openstack.org/. If you have launchpad account you can use the same account by simply pressing the sign-in button and then entering launchpad credentials.
- While you are at it, generate an ssh-key in the machine from whcih you will be pushing your code to gerrit by issuing the command,
ssh-keygen –t rsa
less ~/.ssh/id_rsa.pub
Now copy and paste the key to https://review.openstack.org/#/settings/ssh-keys - You will need to sign the 'Individual Contributor License Agreement'. It's an electronic document by which you give openstack foundation all rights to your code. Unless you are an U.S. Government Employee, agree to the Individual Contributor License Agreement and provide contact information.
- Check if you have git installed in your system, as git is the versioning system used by gerrit and openstack. You also need git-review for submitting code to gerrit for reviewing. If yes, you need to set up meta-data by,
- Now, you can clone the module code which you need to submit patch to.
- Go to that source folder and check connectivity with the gerrit remote by,
- You will need to set up gerrit username, whcih can be accessed by visiting https://review.openstack.org/#/settings/,
- Now before starting your edits you need to create a new branch for your changes, otherwise the changes will be summarily rejected by the system because gerrit will not allow random changes in the master. For this,
- Now, you are ready to submit codes for reviewing by committing and then sending for review.
- Commits are done by git commit which will prompt for a commit message to be entered. Committing will create a change-id for your change. Change id has to remain same for all the commits you do otherwise gerrit will screw things up.
- If you need to edit the same commit again, don't create another unrelated commit, instead use git commit -a. -a is for amend.
- It's advisable to sign off the commit by git commit -s. This will append a tag, Signed-off-by: Full Name
in the commit message. - When you are done with all the edits/commits and ready to submit code for review, use git review to do that.
- Now, if during review process, certain edits are suggested by reviewers you can easily update them by following a cycle of commit with append + review update.
git config --global user.email "your_email@youremail.com"
git checkout master
git pull --ff-only origin master
git checkout -b TOPIC-BRANCH
TOPIC_BRANCH can be anything related to what you are doing. If you are working on a blueprint, name your topic branch bp/BLUEPRINT where BLUEPRINT is the name of a blueprint in Launchpad (for example, bp/authentication). When working on bugs name the branch bug/BUG-NUMBER (for example, bug/1234567). Otherwise, give it a meaningful name because it will show up as the topic for your change in Gerrit.
git review
For more information and trouble-shooting directions,
Comments
Post a Comment